

JDBC API is a Java API that can access any kind of tabular data, especially data stored in a Relational Database. JDBC works with Java on a variety of platforms, such as Windows, Mac OS, and the various versions of UNIX.
Audience
This tutorial is designed for Java programmers who would like to understand the JDBC framework in detail along with its architecture and actual usage.
Prerequisites
Before proceeding with this tutorial, you should have a good understanding of Java programming language. As you are going to deal with RDBMS, you should have prior exposure to SQL and Database concepts.
What is JDBC?
JDBC stands for Java Database Connectivity, which is a standard Java API for database-independent connectivity between the Java programming language and a wide range of databases.
The JDBC library includes APIs for each of the tasks mentioned below that are commonly associated with database usage.
- Making a connection to a database.
- Creating SQL or MySQL statements.
- Executing SQL or MySQL queries in the database.
- Viewing & Modifying the resulting records.
Fundamentally, JDBC is a specification that provides a complete set of interfaces that allows for portable access to an underlying database. Java can be used to write different types of executables, such as −
- Java Applications
- Java Applets
- Java Servlets
- Java ServerPages (JSPs)
- Enterprise JavaBeans (EJBs).
All of these different executables are able to use a JDBC driver to access a database, and take advantage of the stored data.
JDBC provides the same capabilities as ODBC, allowing Java programs to contain database-independent code.
Pre-Requisite
Before moving further, you need to have a good understanding of the following two subjects −
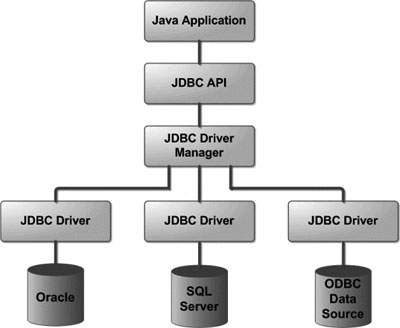
JDBC Architecture
The JDBC API supports both two-tier and three-tier processing models for database access but in general, JDBC Architecture consists of two layers −
- JDBC API: This provides the application-to-JDBC Manager connection.
- JDBC Driver API: This supports the JDBC Manager-to-Driver Connection.
The JDBC API uses a driver manager and database-specific drivers to provide transparent connectivity to heterogeneous databases.
The JDBC driver manager ensures that the correct driver is used to access each data source. The driver manager is capable of supporting multiple concurrent drivers connected to multiple heterogeneous databases.
Following is the architectural diagram, which shows the location of the driver manager with respect to the JDBC drivers and the Java application −
Common JDBC Components
The JDBC API provides the following interfaces and classes −
- DriverManager: This class manages a list of database drivers. Matches connection requests from the java application with the proper database driver using communication sub protocol. The first driver that recognizes a certain subprotocol under JDBC will be used to establish a database Connection.
- Driver: This interface handles the communications with the database server. You will interact directly with Driver objects very rarely. Instead, you use DriverManager objects, which manages objects of this type. It also abstracts the details associated with working with Driver objects.
- Connection: This interface with all methods for contacting a database. The connection object represents communication context, i.e., all communication with database is through connection object only.
- Statement: You use objects created from this interface to submit the SQL statements to the database. Some derived interfaces accept parameters in addition to executing stored procedures.
- ResultSet: These objects hold data retrieved from a database after you execute an SQL query using Statement objects. It acts as an iterator to allow you to move through its data.
- SQLException: This class handles any errors that occur in a database application.
The JDBC 4.0 Packages
The java.sql and javax.sql are the primary packages for JDBC 4.0. This is the latest JDBC version at the time of writing this tutorial. It offers the main classes for interacting with your data sources.
The new features in these packages include changes in the following areas −
- Automatic database driver loading.
- Exception handling improvements.
- Enhanced BLOB/CLOB functionality.
- Connection and statement interface enhancements.
- National character set support.
- SQL ROWID access.
- SQL 2003 XML data type support.
- Annotations.
- Structured Query Language (SQL) is a standardized language that allows you to perform operations on a database, such as creating entries, reading content, updating content, and deleting entries.SQL is supported by almost any database you will likely use, and it allows you to write database code independently of the underlying database.This chapter gives an overview of SQL, which is a prerequisite to understand JDBC concepts. After going through this chapter, you will be able to Create, Create, Read, Update, and Delete (often referred to as CRUD operations) data from a database.For a detailed understanding on SQL, you can read our MySQL Tutorial.
Create Database
The CREATE DATABASE statement is used for creating a new database. The syntax is −SQL> CREATE DATABASE DATABASE_NAME;
Example
The following SQL statement creates a Database named EMP −SQL> CREATE DATABASE EMP;
Drop Database
The DROP DATABASE statement is used for deleting an existing database. The syntax is −SQL> DROP DATABASE DATABASE_NAME;
Note: To create or drop a database you should have administrator privilege on your database server. Be careful, deleting a database would loss all the data stored in the database.Create Table
The CREATE TABLE statement is used for creating a new table. The syntax is −SQL> CREATE TABLE table_name ( column_name column_data_type, column_name column_data_type, column_name column_data_type ... );
Example
The following SQL statement creates a table named Employees with four columns −SQL> CREATE TABLE Employees ( id INT NOT NULL, age INT NOT NULL, first VARCHAR(255), last VARCHAR(255), PRIMARY KEY ( id ) );
Drop Table
The DROP TABLE statement is used for deleting an existing table. The syntax is −SQL> DROP TABLE table_name;
Example
The following SQL statement deletes a table named Employees −SQL> DROP TABLE Employees;
INSERT Data
The syntax for INSERT, looks similar to the following, where column1, column2, and so on represents the new data to appear in the respective columns −SQL> INSERT INTO table_name VALUES (column1, column2, ...);
Example
The following SQL INSERT statement inserts a new row in the Employees database created earlier −SQL> INSERT INTO Employees VALUES (100, 18, 'Zara', 'Ali');
SELECT Data
The SELECT statement is used to retrieve data from a database. The syntax for SELECT is −SQL> SELECT column_name, column_name, ... FROM table_name WHERE conditions;
The WHERE clause can use the comparison operators such as =, !=, <, >, <=,and >=, as well as the BETWEEN and LIKE operators.Example
The following SQL statement selects the age, first and last columns from the Employees table, where id column is 100 −SQL> SELECT first, last, age FROM Employees WHERE id = 100;
The following SQL statement selects the age, first and last columns from the Employees table where first column contains Zara −SQL> SELECT first, last, age FROM Employees WHERE first LIKE '%Onuoha%';
UPDATE Data
The UPDATE statement is used to update data. The syntax for UPDATE is −SQL> UPDATE table_name SET column_name = value, column_name = value, ... WHERE conditions;
The WHERE clause can use the comparison operators such as =, !=, <, >, <=,and >=, as well as the BETWEEN and LIKE operators.Example
The following SQL UPDATE statement changes the age column of the employee whose id is 100 −SQL> UPDATE Employees SET age=20 WHERE id=100;
DELETE Data
The DELETE statement is used to delete data from tables. The syntax for DELETE is −SQL> DELETE FROM table_name WHERE conditions;
The WHERE clause can use the comparison operators such as =, !=, <, >, <=,and >=, as well as the BETWEEN and LIKE operators.Example
The following SQL DELETE statement deletes the record of the employee whose id is 100 −SQL> DELETE FROM Employees WHERE id=100;
To start developing with JDBC, you should setup your JDBC environment by following the steps shown below. We assume that you are working on a Windows platform.
Install Java
Install J2SE Development Kit 5.0 (JDK 5.0) from Java Official Site.
Make sure following environment variables are set as described below −
- JAVA_HOME: This environment variable should point to the directory where you installed the JDK, e.g. C:\Program Files\Java\jdk1.5.0.
- CLASSPATH: This environment variable should have appropriate paths set, e.g. C:\Program Files\Java\jdk1.5.0_20\jre\lib.
- PATH: This environment variable should point to appropriate JRE bin, e.g. C:\Program Files\Java\jre1.5.0_20\bin.
It is possible you have these variable set already, but just to make sure here's how to check.
- Go to the control panel and double-click on System. If you are a Windows XP user, it is possible you have to open Performance and Maintenance before you will see the System icon.
- Go to the Advanced tab and click on the Environment Variables.
- Now check if all the above mentioned variables are set properly.
You automatically get both JDBC packages java.sql and javax.sql, when you install J2SE Development Kit 5.0 (JDK 5.0).
Install Database
The most important thing you will need, of course is an actual running database with a table that you can query and modify.
Install a database that is most suitable for you. You can have plenty of choices and most common are −
- MySQL DB: MySQL is an open source database. You can download it from MySQL Official Site. We recommend downloading the full Windows installation.In addition, download and install MySQL Administrator as well as MySQL Query Browser. These are GUI based tools that will make your development much easier.Finally, download and unzip MySQL Connector/J (the MySQL JDBC driver) in a convenient directory. For the purpose of this tutorial we will assume that you have installed the driver at C:\Program Files\MySQL\mysql-connector-java-5.1.8.Accordingly, set CLASSPATH variable to C:\Program Files\MySQL\mysql-connector-java-5.1.8\mysql-connector-java-5.1.8-bin.jar. Your driver version may vary based on your installation.
- PostgreSQL DB: PostgreSQL is an open source database. You can download it from PostgreSQL Official Site.The Postgres installation contains a GUI based administrative tool called pgAdmin III. JDBC drivers are also included as part of the installation.
- Oracle DB: Oracle DB is a commercial database sold by Oracle . We assume that you have the necessary distribution media to install it.Oracle installation includes a GUI based administrative tool called Enterprise Manager. JDBC drivers are also included as a part of the installation.
Install Database Drivers
The latest JDK includes a JDBC-ODBC Bridge driver that makes most Open Database Connectivity (ODBC) drivers available to programmers using the JDBC API.
Now a days, most of the Database vendors are supplying appropriate JDBC drivers along with Database installation. So, you should not worry about this part.
Set Database Credential
For this tutorial we are going to use MySQL database. When you install any of the above database, its administrator ID is set to root and gives provision to set a password of your choice.
Using root ID and password you can either create another user ID and password, or you can use root ID and password for your JDBC application.
There are various database operations like database creation and deletion, which would need administrator ID and password.
For rest of the JDBC tutorial, we would use MySQL Database with usernameas ID and password as password.
If you do not have sufficient privilege to create new users, then you can ask your Database Administrator (DBA) to create a user ID and password for you.
Create Database
To create the EMP database, use the following steps −
Step 1
Open a Command Prompt and change to the installation directory as follows −
C:\>
C:\>cd Program Files\MySQL\bin
C:\Program Files\MySQL\bin>
Note: The path to mysqld.exe may vary depending on the install location of MySQL on your system. You can also check documentation on how to start and stop your database server.
Step 2
Start the database server by executing the following command, if it is already not running.
C:\Program Files\MySQL\bin>mysqld
C:\Program Files\MySQL\bin>
Step 3
Create the EMP database by executing the following command −
C:\Program Files\MySQL\bin> mysqladmin create EMP -u root -p
Enter password: ********
C:\Program Files\MySQL\bin>
Create Table
To create the Employees table in EMP database, use the following steps −
Step 1
Open a Command Prompt and change to the installation directory as follows −
C:\>
C:\>cd Program Files\MySQL\bin
C:\Program Files\MySQL\bin>
Step 2
Login to the database as follows −
C:\Program Files\MySQL\bin>mysql -u root -p
Enter password: ********
mysql>
Step 3
Create the table Employee as follows −
mysql> use EMP;
mysql> create table Employees
    -> (
    -> id int not null,
    -> age int not null,
    -> first varchar (255),
    -> last varchar (255)
    -> );
Query OK, 0 rows affected (0.08 sec)
mysql>
Create Data Records
Finally you create few records in Employee table as follows −
mysql> INSERT INTO Employees VALUES (100, 18, 'Okafor', 'Samuel');
Query OK, 1 row affected (0.05 sec)

mysql> INSERT INTO Employees VALUES (101, 25, 'Ugochukwu', 'Sola');
Query OK, 1 row affected (0.00 sec)

mysql> INSERT INTO Employees VALUES (102, 30, 'Zainab', 'Kingsley');
Query OK, 1 row affected (0.00 sec)

mysql> INSERT INTO Employees VALUES (103, 28, 'Onuoha', 'David');
Query OK, 1 row affected (0.00 sec)

mysql>
You can download books on MYSQL for complete tutorial
No comments:
Post a Comment